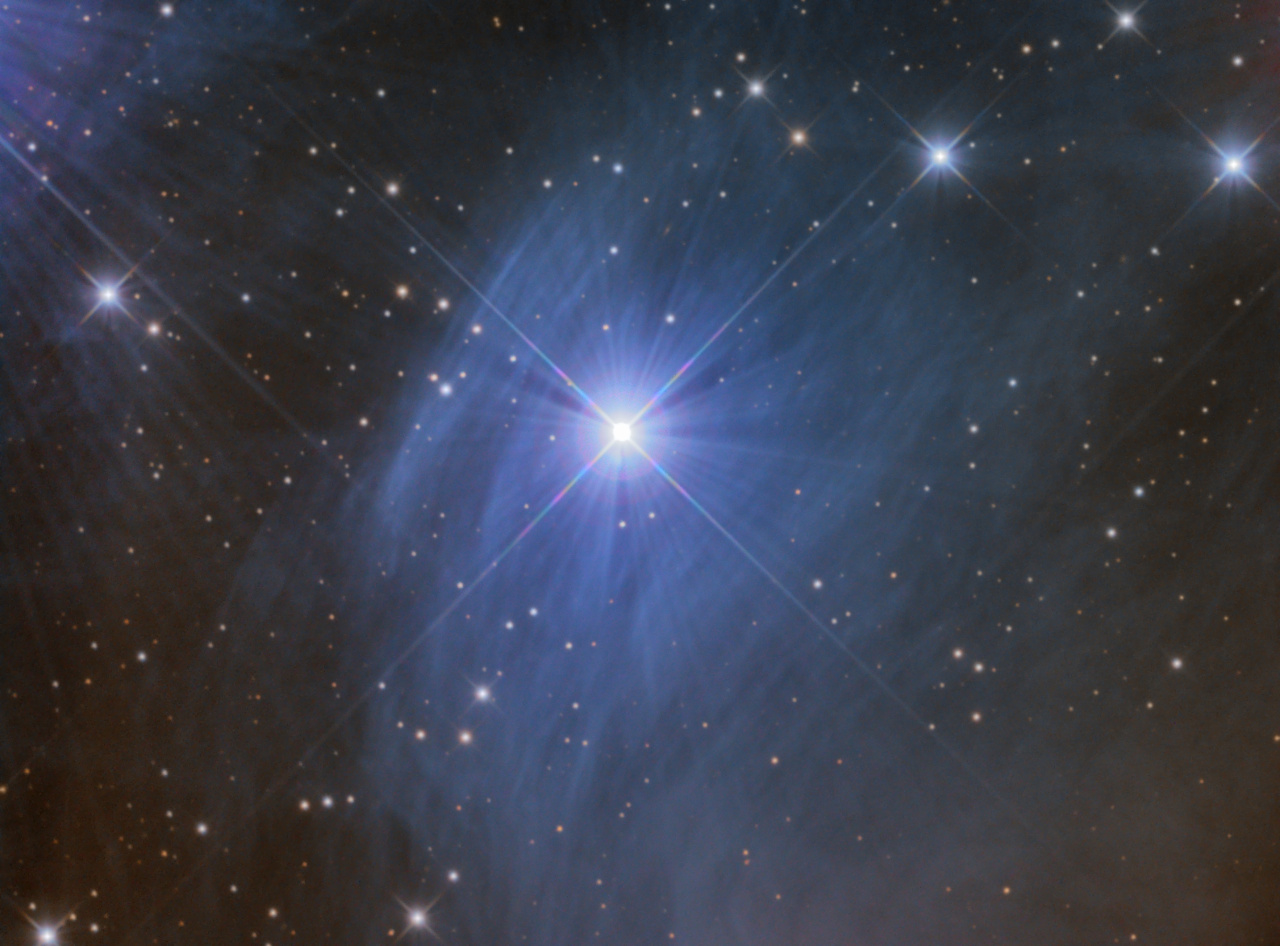
Category Archives: equipment

Merope & Tempel’s Nebula (NGC1435)

Image centred at:
RA: 03° 46′ 18″
Dec: +23° 56′ 04″
Field of view: 25.46′ x 18.82′

Merope & NGC1435 (Tempel's Nebula)
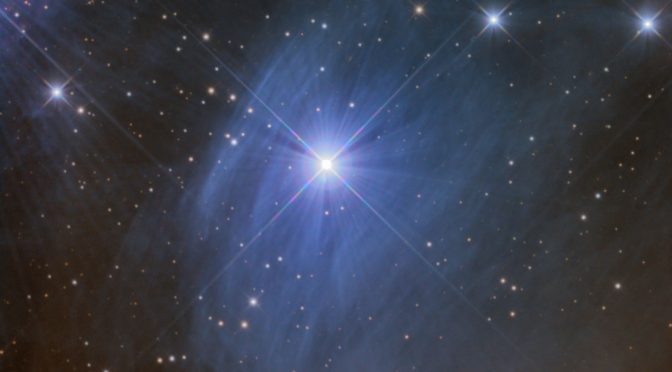
The Pleiades open cluster in Taurus is one of the brightest and most recognisable objects int he winter sky. As a first LRGB image using the 14″ Newtonian, and to test the setup of the off-axis guider, I imaged the area around Merope (23 Tau). This was also the first use of a Bahtinov mask that I got laser cut by Oxford Hackspace. The focusing mask works excellently – this should be a real plus, especially for any planetary/lunar work.

The particular area of nebulosity imaged here around Merope was discovered by Wilhelm Tempel on October 19th, 1859, and is catalogued as NGC1435. The dust isn’t in fact the nebula from which the cluster formed, rather that the Pleiades happen to be travelling through a particularly dense part of interstellar medium. This dust scatters blue light from the cluster members, resulting in the reflection nebula visible to us.

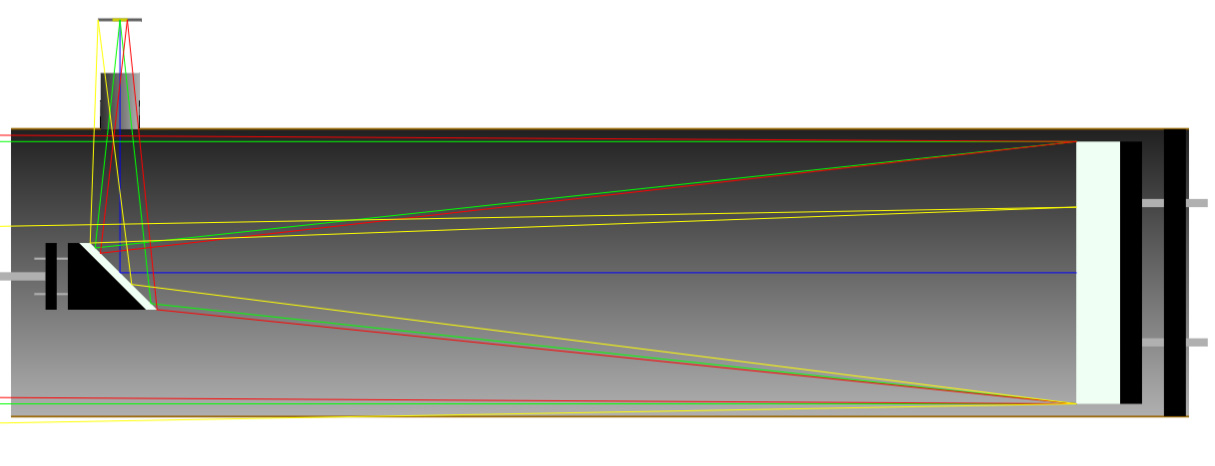
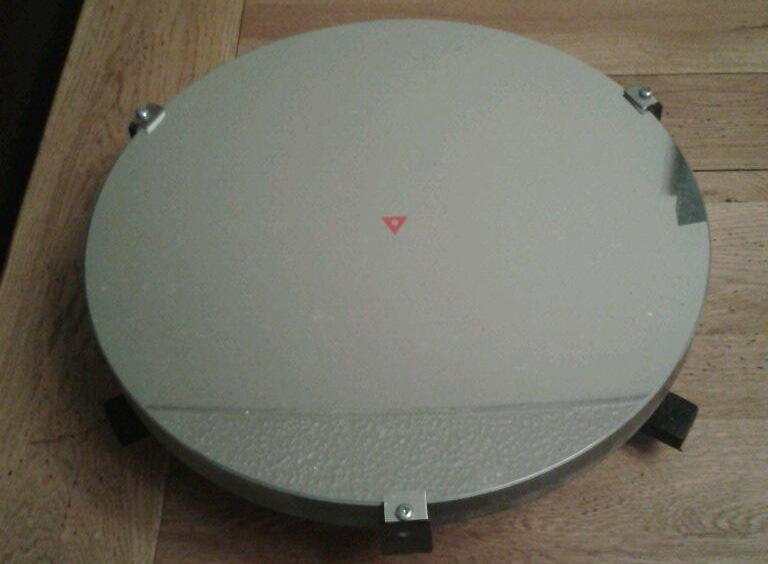
The image shows strong diffraction spikes from the secondary spider, as would be expected. There’s also further diffraction visible around the brightest stars dark shadowing present at 60 degree angles, which is the result of the mirror retaining “clips” (they are not actually clips – they are part of the cell in the case of the 9 point Orion Optics mirror cell). To remedy this would require a mask to be added over the outer edge of the mirror to cover these over – this is maybe something I’ll think about making in the future to help deal with tricky situations like this! 

The additional dark shadow pointing to the right appears to be the focuser drawtube intruding on the internal light path inside the scope – that’s probably something that can only be cured by either a shorter drawtube, or shortening the truss tubes. Again. Maybe I’ll wait in case I decide to change coma corrector at some point, in which case it’ll probably need a change to the focal plane position anyway.

The image was taken on the evening of the 7th Jan 2018 through the 14″ (350mm) Newtonian, with an ST2000XM and an MPCC v1 coma corrector. Total exposure was “only” 2h 32m (L: 59m (20x1m, 13x3m), RGB: 31m (10x1m, 7x3m) each channel). Processing in Pixinsight and Photoshop CS4.

Widefield Heart, Soul & Double Cluster

Image centred at:
RA: 02h 44m 19s
Dec: +61° 17′ 24″
Field is 15°x10°.
(Plate-solve by nova.astrometry.net)

Taken on the night of the 25th November 2017 from West Oxfordshire, this image is a widefield rendition of the Heart and Soul Nebulae (IC1805/Sh2-190 and IC1848/Sh2-199), which includes the Double Cluster (NGC 869 and NGC 884) in Perseus. 

Widefield image of Heart and Soul Nebulae (IC1805/Sh2-190, IC1848/Sh2-199) and Double Cluster (NGC 869 and NGC 884) and Surrounds

This was the first real test of a new widefield config that’s now driven by a Raspberry Pi 3 running KStars and Ekos under Ubuntu Mate. The RPi3 controls the camera: a Baader filter modded Canon 350d (with shutter control via a serial release cable); a Moonlite compatible, Arduino based motor focuser (with stepper driven belt drive for the lens) ; and the Losmandy GM-8 mount it all sits upon. I can remote onto the RPi using VNC to control the session as it goes, and Ekos does everything including pointing and plate-solves, camera control and autofocusing. Everything is mounted on a somewhat Heath-Robinson arrangement on a standard Losmandy dovetail (lots of velcro pads!).

Within the camera is an IDAS P2 filter – this is a multi-bandpass, light pollution suppression filter that allows for an increase in contrast between deep sky objects and the background sky levels – it isn’t a substitute for full narrowband filters, but it at least allows an improved colour rendition of the target. It’s held in an MFA (mount filter adaptor) that screws into a small hole inside the camera body, holding the filter between the EF lens and the flip mirror. 

Exposures here were 5 minutes long each at ISO400 f4.5, with 45 subframes in total – combined exposure is 3h45m. Reduction and processing took place in Pixinsight, with only a small bit of amp glow removal in Photoshop. 

Annotated widefield image of the Heart and Soul Nebulae the Double Cluster and surrounds.

An annotated image showing the position of deep sky objects, coordinates and constellation figures/boundaries is also shown. There are, however, several objects that aren’t included in the labelling here – the reflection nebula LBN 142.14+01.97 (LBN 682/Ced 14) in Camelopardalis is just visible to the left (east) of faint emission nebula Sh2-202. Open cluster Stock 2 is located (just) in Cassiopeia (to the right of the constellation label text!). And, though labelled up as SH2-191 and Sh2-197, the obscured local galaxies Maffei 1 and 2 are just visible as small, reddened smudges south of the Heart. 

Bubble Nebula + M52; Equipment Updates

The past few months have seen some changes to my equipment – unfortunately the biggest (or most expensive) change was due to my original Gemini 1 controller dying. The mount is back in action after I upgraded to a Gemini 2 from Losmandy via an existing owner trade-in. Good news is that the mount appears to be working well, though still needs PEC sorting and full building of pointing models.

I’ve also got a 0.8x reducer/flattener for the William Optics FLT110 (this is the latest model of the William Optics FLAT4 reducer), allowing me a larger field of view on the SBIG ST2000X, a flatter, faster field, and also the ability to mount a recently acquired, astro-modded Canon 350d on there as well – I look forward to trying to image the Pleiades and the Orion Nebula using a sensitive, wide field arrangement this winter… I also have started to use Pixinsight for processing images; while it’s been a learning curve for me, I feel I’m starting to get somewhere in using it, and think it could be a very powerful tool.

Bubble Nebula (NGC7635) & M52I have managed to put the new kit to use already: after tuning the spacing for the CCD camera, I managed to take a lot of sub-frames of the Bubble Nebula (NGC 7635) and M52. The image shown is in H-Alpha (using the Astrodon 5nm filter) and consists of 7hrs total in 20min subframes (at -20C). 

The Bubble itself is a large  (~7 light year) void formed by the action of the fierce stellar wind from a hot, highly luminous Wolf-Rayet star. This star also causes excitation of the surrounding nebula, giving us the H-Alpha light we image here. M52 is the open cluster to the bottom right, with Czernik 43 the slightly looser open cluster to the right of the image. The nebulosity to the bottom left is part of the larger region SH2-158, and the smaller areas of nebulosity to the top centre-left of the frame is the not often referenced planetary nebula KjPn8 (though this is quite faint here and needs a bit more magnification, and a lot more data to pull out well!)

Field is centred at: 
RA: 23h 22m 29.0s
Dec: +61° 19′ 07.7″
Up is 0.71 degrees E of N
(plate-solve from nova.astrometry.net)

Orion Optics SPX – 6 Point Mirror Cell Mod

I’ve recently completed the first stage of modifying the mirror cell to convert it to use 6 point supports instead of 3 points.

By modelling deformations of the 350mm mirror in PLOP, I get the following figures for the current 3 points:

Support radius = 123mm
P-V: 1.65 x 10⁻⁴mm (~1/5λ at 500nm)
RMS: 3.81 x 10⁻⁵mm (~1/13λ)

For a mirror with a zygo report of 1/12λ P-V, this is less than impressive!

By using equally spaced 6 point supports, these figures are:

Support radius = 110mm
P-V: 1.07 x 10⁻⁵mm (~1/46λ)
RMS: 2.37 x 10⁻⁶mm (~1/210λ!)

So it can be shown that the deformations are potentially over an order of magnitude better using 6 points. Interestingly, allowing PLOP to run for a 9-point cell for the same mirror gives a slightly worse result than the 6 point, and though the 9 point is much better than a 3 point it’s harder to adapt this cell into.

Orion Optics Mirror Cell with 6 point mod
350mm Orion SPX Mirror Cell with mod…

My modification adds three “U” shaped supports that attach to the existing cell parts (being attached loosely via an M8 bolt to allow them to rock a little). There are two nylon mushroom head bolts that screw into these parts which the mirror will sit upon (these are the black cross heads in the image).

I think I’ll most likely need some mechanism to stop the bars rotating (but this might just be a bit of tape), and I’ll need new lateral nylon grub screws as 2 of the three current ones are well and truly stuck!

Refurbishing the Newtonian

"Newt" Raytrace for SPX350
“Newt” Raytrace for SPX350

I’ve been working recently towards finally completing the observatory dome in my back garden (that I bought almost 4 years ago now…) – with flooring done and power connected, I need just some steps, finish security and I can start to setup.

Attention has turned towards the Orion Optics SPX350 that’s been languishing in my garage awaiting use. I’ve known that the current secondary mirror doesn’t offer anywhere near enough completely illuminated field – and so I’ve finally measured the location of the focal plane  and using the excellent “Newt” software (now available as a web based app) and determined the size of a new secondary mirror for it. Yesterday I ordered a new 89mm secondary from Galvoptics that I plan to mount in a new secondary holder from Protostar (and hoping I won’t need a new spider :-/ ). This should give me a 100% illuminated diameter approaching 20mm – more than enough to cover the KAI2020 CCD chip I use, and good enough (with flats) should I decide to try upgrading to a KAF-8300 based camera in the future.

SPX350 - Primary Mirror
Primary Mirror – warts and all.

More importantly, the primary is going to need some work to bring it back to its full potential (the original zygo report says it is ~1/12 wave P-V) as even after washing off the dead moth remains (!) and flies, the coatings look to be past it, and there’s a load of spider poo stuck to the surface as well. Here’s hoping that they will clean off well and it’ll recoat fine – and so once I have the new secondary installed, a trip to Newcastle-under-Lyme will be needed in due course to look to get the whole thing serviced.

More to follow.